Sunday, April 1, 2012

How to enter connection string on runtime?

One of the challenging tasks in .NET programming is changing the connection string on runtime. In this post, I will give you the simple step to complete this task.
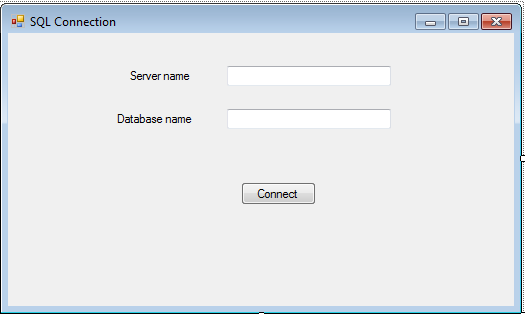
Step 1: Create a SQL Conneciton form:
On the Solution Explorer panle, right click on your project,  select Add->New Item. Select Window Form. Name it SLQConnection, then click OK. Design it as the figure bellow:

Step 2: Create an app.config file
On the Solution Explorer, right click on your project, select Add->New Item. On the dialog appeared, click on Application Configuration File, name it app.config. Click OK
Open app.config file, modifying it as the figure bellow
Step 3: Coding
On the SQLConnection.cs file, add the following code:
        public void updateConfigFile(string con)
        {                       
            XmlDocument XmlDoc = new XmlDocument();
            //Road the Config file
            XmlDoc.Load(AppDomain.CurrentDomain.SetupInformation.ConfigurationFile);
            foreach (XmlElement xElement in XmlDoc.DocumentElement)
            {
                if (xElement.Name == "connectionStrings")
                {
                    //setting the connection string
                    xElement.FirstChild.Attributes[2].Value = con;
                }
            }
            //write the connection string in app.config file
            XmlDoc.Save(AppDomain.CurrentDomain.SetupInformation.ConfigurationFile);
        }

Double click on Connect button of the Form created in step 1
Add the following code to the On_Clikc event of the button
          
                StringBuilder Con = new StringBuilder("Data Source=");
                Con.Append(txtServerName.Text);
                Con.Append(";Initial Catalog=");
                Con.Append(txtDBName.Text);
                Con.Append(";Integrated Security=SSPI;");
                string strCon = Con.ToString();
                updateConfigFile(strCon);
 
                //create a new connection
                SqlConnection conn = new SqlConnection();
                ConfigurationManager.RefreshSection("connectionStrings");
                conn.ConnectionString = ConfigurationManager.ConnectionStrings["Conn"].ToString();                               
                //get data from a table to test the connection
                SqlDataAdapter da = new SqlDataAdapter("select * from Users", conn);
                DataTable dt = new DataTable();
                da.Fill(dt);
                if (dt.Rows.Count > 0)
                {
                    MessageBox.Show("Connection successful", "Notice", MessageBoxButtons.OK, MessageBoxIcon.Exclamation);                                                
                }
                else
                {
                    MessageBox.Show("Connection failed", "Notice", MessageBoxButtons.OK, MessageBoxIcon.Exclamation);
                }


To get the connection string on runtime, use the following code
string cnstr = ConfigurationManager.ConnectionStrings["Conn"].ToString();


Now, test it!

Hope this helps!
          

Saturday, March 31, 2012

How to get data from Access database in C#?

The following are the complete code to get data from Access database:

First, we connect to the database.
public DataTable getData()
{
            string cnStr = "Provider=Microsoft.Jet.OleDb.4.0; Data Source=HR.mdb";
            OleDbConnection cn = new OleDbConnection(cnStr);

            string sql = "select * from Employees";
            OleDbDataAdapter da = new OleDbDataAdapter(sql, cn);
            DataTable dt = new DataTable();
            da.Fill(dt);   
            return dt;
}

Then,  we load the data to Listview control
public void loadToListView()
{
             DataTable dt = getData();
             for (int i = 0; i < dt.Rows.Count; i++)
            {
                DataRow row = dt.Rows[i];
                int id = Convert.ToInt32(row["EmpID"]);
                string fName = row["FirstName"].ToString();
                string lName = row["LastName"].ToString();

                Employees emp = new Employees(id, fName, lName);
                ListViewItem item = new ListViewItem(id.ToString());
                item.SubItems.Add(fName);
                item.SubItems.Add(lName);
                item.Tag = entity;

                lvEmp.Items.Add(item);

            }
}
Make sure that you had copied the Access database file into bin/Debug.
Hope this helps!


Friday, February 10, 2012

Programmatically read and write a text file

The following is the source code for reading and writing a text file by C#

        void readData()
        {
             string filePath = Application.StartupPath + @"\data.txt";           
             if (File.Exists(filePath) == true)
            {
                StreamReader reader = new StreamReader(filePath);
                while (reader.EndOfStream == false)
                {
                    string line = reader.ReadLine();
                    if (string.IsNullOrEmpty(line)) continue;

                    Messagebox.Show(line);
                }
                reader.Close();
            }           
        }

        void writeData()
       {
            string filePath = Application.StartupPath + @"\data.txt";
            StreamWriter writer = new StreamWriter(filePath);                         
            string line = "This is a text file";
            writer.WriteLine(line);
           
            writer.Flush();
            writer.Close();

            MessageBox.Show("Saved");
       }

Hope this help!

Sunday, February 5, 2012

Using SPQuery to return SharePoint list items

Using SPQuery and CAML(Collaborative Application Markup Language) is an efficient way to retrieve data in SharePoint list. It help us to filter and order items in the selected list.
In this post, I want to introduce to you an example of using them.
In the following code, I want to get all the employees with the position of Developer in Employee list, then, I order them by their Salary ascending.

            SPWeb web = SPContext.Current.Web;
            SPList list = web.Lists["Employee"];
            string query = @"<Where>
                                              <Eq>
                                                    <FieldRef Name='Position' /><Value Type='Choice'>{0}</Value>
                                             </Eq>
                                   </Where>
                                   <OrderBy>
                                            <FieldRef Name='Salary' Ascending='False' />
                                   </OrderBy>";
            query = string.Format(query, "Developer");                                                           
            SPQuery spQuery = new SPQuery();
            spQuery.Query = query;
            SPListItemCollection items = list.GetItems(spQuery);
            grid.DataSource = items.GetDataTable();
            grid.DataBind();

Result:


Hope this helps!

Thursday, February 2, 2012

Sharepoint 2010 – New functionalities for listings

Enforce Unique Values in Site Columns Ability

In MOSS 2007, we do not have any option to set unique column value for the field in document library or list. We can still achieve that with the help of event handlers and adding some code in the ItemAdding event. But still there was no direct way to do it.
Now in SharePoint 2010, we have the built in functionality to enforce the uniqueness of the field. But yes do remember that the field must be indexed first before you want to set it as a primary key.
Well, just a quick question. Do we have anything as primary key in MOSS 2007? Yes, we do have and that is ID field in list or library. However that does not solve the purpose as it is just used to identify items and used heavily in coding purpose.
So let’s see how to go ahead with primary key in list field.
Create a list in SharePoint 2010 site and then create a field that you want to have a primary key. Go to list settings. Go to indexed columns and choose that column to be indexed.
When you create a field now then we have an option to enforce the unique value. This can be set only when you have made that column indexed. So if you have not indexed this column, SP 2010 will ask you to do it.
 Once you set this field as unique key, then go ahead and add one value and try to add another with the same. It will not allow you to do so and show the message.

Lookup

SharePoint 2010 offers a lot of new functionality for listings. One of them is “Additional Columns”. So what does it mean?
This means that you create a lookup field from the Annoucement list. But if i want to see the Title and the Expires, simply stick in the check box as the following figure. This is established using so called additional columns.
 

Validation settings

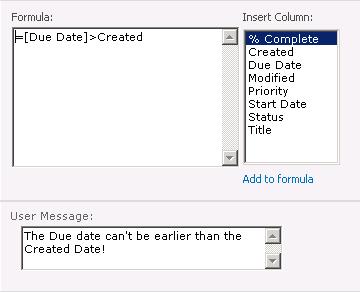
In SharePoint 2010, a new setting point in List and Library settings is available. This point is called “Validation settings”. Validation settings will be very missed in SharePoint 2007, because there wasn’t a way to avoid such easy and daily business related things like dates in the past etc. It seems that this will be worked with SharePoint 2010, but how the feature looks like? In the pre-beta version of SP2010 I work with, you can buil expresions like in calculated columns. I tried the following expression:

And, there’s the trick, I wasn’t able to save the task! Ok, in this version I don’t get the message that was set up in the validation settings, but seems it works! Validation isn’t the newest feature at all, but hey, it’s reeeeaaly usefull!
Hope this help!

Sunday, January 22, 2012

Saving Changes Is Not Permitted On SQL Server 2008. How To Solve?

Saving Changes is not permitted occurs when doing alter table (table structure is changed):
  1. change data type on existing columns
  2. or change allow nulls on existing columns
To allow you to saving changes after you alter table, do disable prevent changes:
  1. Open microsoft SQL Server Management Studio 2008
  2. Click Tools, then click Options
  3. Click Designers
  4. Uncheck prevent saving changes that require table re-creation
  5. Click OK
  6. Try to alter your table.
                                                                                                        codeproject.com

Tuesday, January 17, 2012

Do SharePoint & Silverlight Have a Future Together?

Silverlight was Microsoft's answer to Adobe Flash, an application framework with which to build rich internet applications. It was launched in April 2007 to much fanfare, albeit mainly from Microsoft. Version 5 brought GPU accelerated video decoding and 64-bit support in December of last year. It also brought the conclusion of the Silverlight story, as this version is set to be the final release. Silverlight is no more. Or so people have been speculating, as there has yet to be any official word from Microsoft. Its lifespan might be prolonged as a Windows Phone platform, but it seems likely it will cease to exist as a browser plugin.
However this article is not about SIlverlight per se, but rather its somewhat fractured relationship with SharePoint. If we have really seen the final installment of Silverlight, what does that mean for its use with SharePoint in the future? Let’s start by seeing how it is used today.


How SharePoint 2010 Utilizes Silverlight

Silverlight has found some favor with developers as a tool with which to build rich webparts. Video is a popular example, and various media player webparts exist that make use of Silverlight's ability to deliver good quality video over the web. In fact the out-of-the-box SharePoint 2010 media webpart is a Silverlight control. A number of third party webparts also exist that use Silverlight to interact with pictures and audio in interesting ways.
SharePoint 2010 also includes a generic Silverlight webpart, which can be used to host a specific Silverlight application by referencing the document library URL it was deployed to. This method allows such applications to be easily added to content pages. Microsoft tried to encourage this path of integration with an official "blueprint" for Silverlight and SharePoint. This consisted of source code, guidance notes and a number of sample applications.
The out-of-the-box SharePoint 2010 interface also makes use of Silverlight to provide a slick experience for end users. The list selection screen is a good example, offering animation and interaction effects provided by Silverlight.


The Future of SharePoint and Silverlight

But if Silverlight 5 really is to be the final release, what will happen in the future with SharePoint? It seems likely that Silverlight's slow growth as a SharePoint development tool will stall, leading it to be replaced altogether in the next version of the product. No one really knows what it will be replaced by, but the smart money would seem to be HTML5.
Microsoft seems to be making a strategic decision to back HTML5 for web and app-style development. Windows 8 is using HTML5 as its application platform, so it seems likely that the next version of SharePoint will fall in line with this vision.
Expect out-of-the-box Silverlight webparts and Silverlight powered interfaces to disappear. The exception will probably be the "host a Silverlight application" webpart, which may still remain to support any existing legacy implementations. SharePoint 2010 made a big push with web accessibility, greatly improving the HTML its pages and webparts produced. I would expect the back-end and admin pages to see an overhaul in the next version of SharePoint and for both to use HTML5. Whilst the accessibility of these pages is probably less important, it is unlikely Silverlight will remain purely to provide some interface bells and whistles.
I expect to see all traces of Silverlight disappear from the next version of SharePoint. It has been a powerful and useful tool for rich media and interfaces, but it seems its niche approach has run its course. SharePoint 2012 (or 2013) will likely adopt HTML5 for everything Silverlight has previously been used for. Put bluntly, SharePoint and Silverlight have no future at all.

                                                                                                                         http://www.cmswire.com

Friday, January 13, 2012

Change color of GridView Rows on MouseOver event

Here is my simple idea for changing row color of GridView on MouseOver event.
First, we have to create a GridView control, click here for the guide how to create GridView control and bind data to it.
Then, add the following code to your code behind

         void grid_RowDataBound(object sender, GridViewRowEventArgs e)
        {
             if (e.Row.RowType == DataControlRowType.DataRow)
            {
                if (e.Row.RowState == DataControlRowState.Alternate)
                {
                    e.Row.Attributes.Add("onmouseover", "this.style.backgroundColor='#FEEEE1';");
                    e.Row.Attributes.Add("onmouseout", "this.style.backgroundColor='#FFFFFF';");
                }
                else
                {
                    e.Row.Attributes.Add("onmouseover", "this.style.backgroundColor='#FEEEE1';");
                    e.Row.Attributes.Add("onmouseout", "this.style.backgroundColor='#FFFFFF';");
                }
             }
         }

This is the result, you can see the second row in pink as the following figure:
Hope this helps!

Wednesday, January 11, 2012

Heap Sort

What is a Heap?
- Consider the case of ascend sorting, Heap is defined as an array of element al , al+1 ...ar that satisfy: i belong to [l,r] and i starts from 0
  
1/.
a>= a2i +1
2/.
a>= a2i+2     {(ai , a2i +1), (ai ,a2i+2) is a pair of joint elements}

-  If  al , al+1 ...ar is a Heap,  al is the largest element


Algorithm:
- Phase 1: Adjust the initial array to heap (from the middle element of the array)
- Phase 2: Sort the array base on heap
  • Step 1: move the largest element to the end of the array
  • Step 2:
    + Exclude the largest element out of heap: r = r-1 
    + Adjust the remain of array
  • Step 3: Compare r and l:
    + If r > l, repeat step 2
    + Else: stop
Implementation:
        public static void HeapSort (double[] list)
        {
            CreateHeap(list);         
            for (int i = list.Length - 1; i >= 1; i--)
            {
                double Temp = list[0];
                list[0] = list[i];
                list[i] = Temp;              
                Shift (list, 0, i - 1);
            }           
        }
       
        private static void CreateHeap(double []a)
        {         
            for (int i = (a.Length - 1) / 2; i >= 0; i--)
                Shift(a, i, a.Length - 1);
        }

        static void Shift(double[] a, int left, int right)
        {
            int curr = left;
            int joint = 2 * curr + 1;
            double x = a[curr];

            while (joint <= right)
            {
                if (joint < right)
                { 
                    if (a[joint] < a[joint + 1])
                    {
                        joint = joint + 1;
                    }
                }
                if (a[joint] < x)
                {
                    break;
                }
                a[curr] = a[joint];
                curr = joint;
                joint = 2 * curr + 1;
            }
            a[curr] = x;
        }
         
Hope this help!

Tuesday, January 10, 2012

Selection Sort

Idea: 
- Select the smallest element and move to the first position of current array
- Consider the number of elements of  the current array is n-1
- Repeat the two above steps until the number of elements of the current array is 1

Algorithm:
- Step 1: Assign i =0
- Step 2: Loop
       + Look for a[min] from a[i] to a[n-1]
       + Swap a[min] and a[i]
- Step 3: Compare i and n
       + If i <=: i + 1, repeat step 2
       + On the contrary: Stop

Implementation
        static void Swap(ref int a, ref int b)
        {
            int c = a;
            a = b;
            b = c;
        }

        static void SelectionSort(int[] a)
        {
            int max;
            for (int i = 0; i < a.Length - 1; i++)
            {                 
                max = i;
                for (int j = i + 1; j < a.Length; j++)
                {                     
                    if (a[j] > a[max])
                    {
                        max = j;
                    }
                }
                 if (max != i)
                {
                    Swap(ref a[max], ref a[i]);
                }
            }           
        }


Hope this help!

Monday, January 9, 2012

Check all and uncheck all CheckBox in GridView control using Javascript

In this post, I will give an idea on how to check all and uncheck all CheckBox control nested in a Gridview using Javascript without postback.

At first, we need to know how to create a nested GridView control. Visist this post: Create a nested GridView control

Add the following code to inside the Columns tab of the GridView tab:

           <asp:TemplateField ItemStyle-HorizontalAlign="Center">
                <HeaderTemplate>
                   <asp:CheckBox  ID="chkbAll" runat="server"/>
                </ItemTemplate>
                </HeaderTemplate>
                <ItemTemplate>
                    <asp:CheckBox  ID="chkbItem" runat="server" CommandArgument='<%# Eval("ProductID") %>'/>
                </ItemTemplate>               
            </asp:TemplateField>

The GridView appeared as the following figure:

In this scenario, when the user click on the CheckBox in the Header of GridView control, all the CheckBox controls of the all the items will be checked. In contrary, if one(or more) CheckBox of any item is unchecked, the header CheckBox is also unchecked. To achieve these tasks, I use the SelectAll and CheckChanged function in the following Javascript:

<script type="text/javascript" language="javascript">
        function SelectAll(cb) {
            var frm = document.forms[0];
            for (i = 0; i < frm.elements.length; i++) {
                if (frm.elements[i].type == "checkbox" && frm.elements[i].name.indexOf('chkbItem') != -1) {
                    frm.elements[i].checked = document.getElementById(cb).checked;
                }
            }
        }
        function CheckChanged() {
            var frm = document.forms[0];
            var boolAllChecked;
            boolAllChecked = true;
            for (i = 0; i < frm.length; i++) {
                e = frm.elements[i];
                if (e.type == 'checkbox' && e.name.indexOf('chkbItem') != -1)
                    if (e.checked == false) {
                        boolAllChecked = false;
                        break;
                    }
            }
            for (i = 0; i < frm.length; i++) {
                e = frm.elements[i];
                if (e.type == 'checkbox' && e.name.indexOf('chkbAll') != -1) {
                    if (boolAllChecked == false)
                        e.checked = false;
                    else
                        e.checked = true;
                    break;
                }
            }
        }
    </script>

On RowDataBound event of GridView control, add the following cod

        void grid_RowDataBound(object sender, GridViewRowEventArgs e)
        {
            DataRowView drv = e.Row.DataItem as DataRowView;
            if (e.Row.RowType == DataControlRowType.Header)
            {
                CheckBox cbhead = (CheckBox)e.Row.FindControl("ChkbAll");
                cbhead.Attributes.Add("OnClick", "javascript:SelectAll('" + ((CheckBox)e.Row.FindControl("ChkbAll")).ClientID + "')");
            }
            if (e.Row.RowType == DataControlRowType.DataRow)
            {
                CheckBox cbrow = (CheckBox)e.Row.FindControl("ChkbItem");
                cbrow.Attributes.Add("OnClick", "javascript:CheckChanged('" + ((CheckBox)e.Row.FindControl("ChkbItem")).ClientID + "')");
            }
        }

Hope this help!

Sunday, January 8, 2012

What is SEO?

SEO (Search Engine Optimization) is a technique of increasing the rank of your website in search engines—such as Google, Yahoo, Bing or Babylon. A search engine optimization campaign pairs on-site optimization with off-site tactics, which means you make changes to your site itself while building a portfolio of natural looking back links to increase your organic rankings. When Internet users search for products or services that you provide, your website needs to be the first one they find. The search engine optimization process includes researching keywords, creating content, building back links and making sure your website is visible in the search engines. SEO thus helps the search engines recognize your relevance to specific keywords that people search for online.

Read more:
Create Alexa toolbar for your website/blog easily

Add social bookmarking buttons to your blogspot

Tips to increase Alexa Ranking for your website/blog

Wednesday, January 4, 2012

Add multiple items to SharePoint List by using batch command

We'd known how to add one new item to the SharePoint List by using Items.Add() method. But adding multiple items is really more complex. In this post, I will give you a solution for it by using batch command.
I keep using the list named Employee with 5 columns: Title, Birthday, Male, Position, Salary. In this scenario, I have an xml file named Employees.xml with 2 items and I want to add them all to the Employee list

Employees.xml:

<?xml version="1.0" encoding="utf-8" ?>
<Employees>
      <Employee>
            <Title>Le Dung</Title>
            <Birthday>1990/2/2</Birthday>
        <Male>Yes</Male>
            <Position>Developer</Position>
            <Salary>800</Salary>
      </Employee>
      <Employee>
            <Title>Phan Tu</Title>
            <Birthday>1990/1/1</Birthday>
        <Male>Yes</Male>
            <Position>Developer</Position>
            <Salary>800</Salary>
      </Employee>     
</Employees>

The following is the complete code to adding multiple items from xml file to Sharepoint list using batch command.

        protected void addMultiItems()
        {
            SPSecurity.RunWithElevatedPrivileges(delegate()
            {
                SPWeb web = SPContext.Current.Web;
                XmlDocument xmlDoc = new XmlDocument();
                xmlDoc.Load("C:\\Employees.xml");
                XmlElement elmRoot = xmlDoc.DocumentElement;
                XmlNodeList elemList = elmRoot.GetElementsByTagName("Employee");
                if (elemList.Count > 0)
                {                                       
                    web.AllowUnsafeUpdates = true;
                    SPList list = web.Lists["Employee"];
                    lock (this)
                    {
                        StringBuilder addXml = new System.Text.StringBuilder(51200);
                        addXml.Append("<?xml version=\"1.0\" encoding=\"UTF-8\"?><ows:Batch OnError='Continue'>");
                        for(int i=0; i<elemList.Count; i++)
                        {                           
                            addXml.Append("<Method>");
                            addXml.AppendFormat("<SetList Scope=\"Request\">{0}</SetList>", list.ID);
                            addXml.Append("<SetVar Name=\"ID\">New</SetVar>");
                            addXml.Append("<SetVar Name=\"Cmd\">Save</SetVar>");
                            addXml.AppendFormat("<SetVar Name=\"urn:schemas-microsoft-com:office:office#Title\">{0}</SetVar>", elemList[i]["Title"].InnerText != null ? elemList[i]["Title"].InnerText.ToString() : "");
                            string date = elemList[i]["Birthday"].InnerText != null ? elemList[i]["Birthday"].InnerText.ToString() : "";
                            if (date != string.Empty)
                            {
                                date = SPUtility.CreateISO8601DateTimeFromSystemDateTime(DateTime.Parse(date));
                                addXml.AppendFormat("<SetVar Name=\"urn:schemas-microsoft-com:office:office#Birthday\">{0}</SetVar>", date);
                            }                           
                            addXml.AppendFormat("<SetVar Name=\"urn:schemas-microsoft-com:office:office#Position\">{0}</SetVar>", elemList[i]["Position"].InnerText != null ? elemList[i]["Position"].InnerText.ToString() : "");
                            addXml.AppendFormat("<SetVar Name=\"urn:schemas-microsoft-com:office:office#Salary\">{0}</SetVar>", elemList[i]["Salary"].InnerText != null ? elemList[i]["Salary"].InnerText.ToString() : "");

                            string strMale = elemList[i]["Male"].InnerText != null ? elemList[i]["Male"].InnerText.ToString() : "";
                            if (strMale != string.Empty)
                            {
                                if (strMale.ToUpper() != "YES")
                                {
                                    addXml.AppendFormat("<SetVar Name=\"urn:schemas-microsoft-com:office:office#Male\">{0}</SetVar>", "False");
                                }
                                else
                                {
                                    addXml.AppendFormat("<SetVar Name=\"urn:schemas-microsoft-com:office:office#Male\">{0}</SetVar>", "True");
                                }
                            }
                            addXml.Append("</Method>");
                        }                       
                        addXml.Append("</ows:Batch>");                       
                        web.ProcessBatchData(addXml.ToString());                       
                    }
                    web.AllowUnsafeUpdates = false;                                                   
                }
            });
        }

Hope this helps!

Monday, January 2, 2012

Show Header and Footer of GridView with an empty DataSource in C#

When the DataSource  is empty, the GridView is disappeared and we can not use the footer to add new item. In this post, I will give you the method to show Header and Footer when DataSource is empty. The tip here is to add a new blank row to DataTable used as DataSource when no data returned in our query.
                        
        protected void bindToGrid()
        {
            string connstr = "Data Source=WIN2K8; Initial Catalog=ABC;User ID=sa; Password=123";
            DataTable dt = new DataTable();
            SqlConnection conn = new SqlConnection(connstr);
            conn.Open();                                     
            string strsql = "Select * from Products";
            SqlCommand cmd = new SqlCommand(strsql, conn);
            SqlDataAdapter da = new SqlDataAdapter(cmd);
            da.Fill(dt);
            if (dt.Rows.Count > 0)
            {
                grid.DataSource = dt;
                grid.DataBind();
            }
            else
            {
                dt.Rows.Add(dt.NewRow());
                grid.DataSource = dt;
                grid.DataBind();
                this.grid.Rows[0].Visible = false;
            }
            conn.Close();                    
        }

The Header and Footer will be displayed with an empty data as shown in the bellow figure:

Hope this helps!

Read more:

Create a nested GridView control
Get data from SQL database and display in GridView control


Sunday, January 1, 2012

Create a nested GridView control

The following is a simple nested GridView

       <asp:GridView ID="grid" runat="server" EnableViewState="true" AllowPaging="True" PageSize = "5" AllowSorting="True" AutoGenerateColumns="False" AutoGenerateEditButton="true" AutoGenerateDeleteButton="true" CellPadding="4" DataKeyNames="ProductID" ShowFooter="true">
            <Columns>
            <asp:TemplateField HeaderText="Product ID" ItemStyle-HorizontalAlign="Center" >
                <ItemTemplate>
                    <asp:Label runat="server" ID="lblProID" Text='<%#Eval("ProductID")%>'></asp:Label>
                </ItemTemplate>
                <EditItemTemplate>
                    <asp:TextBox runat="server" ID="txtProID" Text='<%#Eval("ProductID")%>'></asp:TextBox>
                </EditItemTemplate>
                <FooterTemplate>
                    <asp:TextBox runat="server" ID="txtProID" ></asp:TextBox>
                </FooterTemplate>
            </asp:TemplateField>
            <asp:TemplateField HeaderText="Product Name" ItemStyle-HorizontalAlign="Center" >
                <ItemTemplate>
                    <asp:Label runat="server" ID="lblProName" Text='<%#Eval("ProductName")%>'></asp:Label>
                </ItemTemplate>
                <EditItemTemplate>
                    <asp:TextBox runat="server" ID="txtProName" Text='<%#Eval("ProductName")%>'></asp:TextBox>
                </EditItemTemplate>
                <FooterTemplate>
                    <asp:TextBox runat="server" ID="txtProName" ></asp:TextBox>
                </FooterTemplate>
            </asp:TemplateField>
            <asp:TemplateField HeaderText="Price" ItemStyle-HorizontalAlign="Center" >
                <ItemTemplate>
                    <asp:Label runat="server" ID="lblPrice" Text='<%#Eval("Price")%>'></asp:Label>
                </ItemTemplate>
                <EditItemTemplate>
                    <asp:TextBox runat="server" ID="txtPrice" Text='<%#Eval("Price")%>'></asp:TextBox>
                </EditItemTemplate>
                <FooterTemplate>
                    <asp:TextBox runat="server" ID="txtPrice" ></asp:TextBox>
                </FooterTemplate>
            </asp:TemplateField>
            <asp:TemplateField HeaderText="Quatity" ItemStyle-HorizontalAlign="Center" >
                <ItemTemplate>
                    <asp:Label runat="server" ID="lblQuatity" Text='<%#Eval("Quantity")%>'></asp:Label>
                </ItemTemplate>
                <EditItemTemplate>
                    <asp:TextBox runat="server" ID="txtQuantity" Text='<%#Eval("Quantity")%>'></asp:TextBox>
                </EditItemTemplate>
                <FooterTemplate>
                    <asp:TextBox runat="server" ID="txtQuatity" ></asp:TextBox>
                </FooterTemplate>
            </asp:TemplateField>
            <asp:TemplateField HeaderText="" ItemStyle-HorizontalAlign="Center" >
                <FooterTemplate>
                    <asp:Button ID="btnInsert" Text="Insert" runat="server" CommandName="Insert" />
                </FooterTemplate>
            </asp:TemplateField>
            </Columns>
    </asp:GridView>   


Hope this helps!

Read more:

Get data from SQL database and display in GridView control 

Saturday, December 31, 2011

Get data from SQL database and display in GridView control

The following are the basic steps to get data from SQL database and bind to GridView control in ASP.net.
I have a Database named ABC with a table named Products, I want to get all the rows in Products table.

Step 1: Create new Project
Launch Visual Studio 2010, click on File->New->Website to create a  new ASP.NET website Project.

Step 2: Create a new Page
Right click on the Project on the Solution Explorer Panel. Select Add->New Item. Then, choose Web Form. I'd like to name it Products.aspx

Step3: Add the following code to the Products.aspx file
<form id="form1" runat="server">
    <div>
    <asp:GridView ID="grid" runat="server">
    </asp:GridView>
   
    </div>
    </form>

Step 4: Add the following code to the Products.aspx.cs file

        protected void bindToGrid()
        {
            string connstr = "Data Source=WIN2K8; Initial Catalog=ABC;User ID=sa; Password=123";
            DataSet ds = new DataSet();
            SqlDataAdapter da;
            DataTable dt = new DataTable();      

            SqlConnection conn = new SqlConnection(connstr);
            conn.Open();
            da = null;                      
            string strsql = "Select * from Products";
            da = new SqlDataAdapter(strsql, conn);
            da.Fill(ds, "ProductsTable");

            grid.DataSource = ds.Tables["ProductsTable"].DefaultView;
            grid.DataBind();          
        }

on the Page_Load event, call the above method

Step 5: Under the configuration tab of the web.config file, add the following code:
<appSettings>
    <add key="ConnectionString" value="Data Source=WIN2K8;Initial Catalog=Products;User ID=sa; Password=123  "/>
  </appSettings>
  <connectionStrings>   
    <add name="ProductsConnectionString" connectionString="Data Source=WIN2K8;Initial Catalog=Products;User ID=sa; Password=Thien123" providerName="System.Data.SqlClient"/>
  </connectionStrings>

Step 6: Build the project
Right click on the project on the Solution Explore and choose Build.
Right click on the Products.aspx file and select View in browser:

We get the result as the bellow figure:

Hope this helps!

Twitter Delicious Facebook Digg Stumbleupon Favorites More

 
Design by Free WordPress Themes | Bloggerized by Lasantha - Premium Blogger Themes | Affiliate Network Reviews